

What Does Sophie's Garden Mean
It is with great joy that I present you with the pattern for Sophie's Dream. Everything about this project makes me so very happy! I hope you've got your hooks at the ready!!
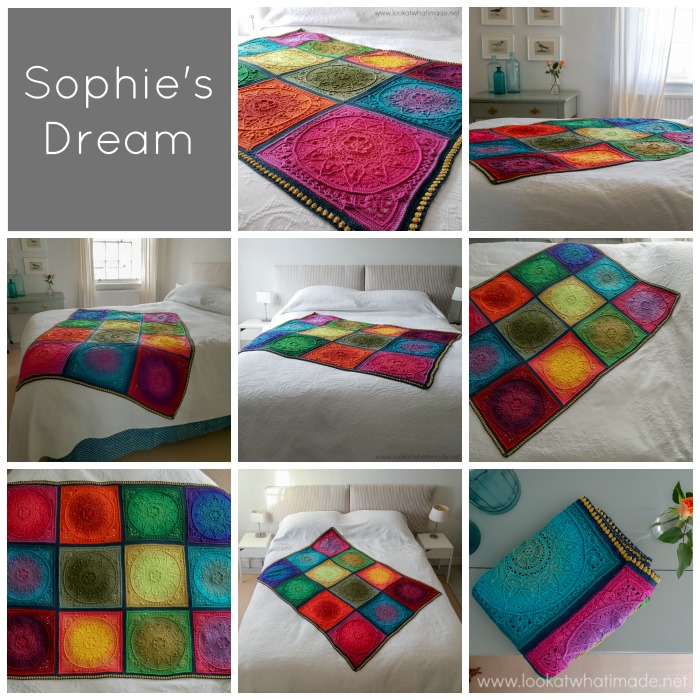
Sophie's Dream is created by making 12 Sophie's Gardens in colourful Whirls, joining and bordering them in Whirlette. Like I have mentioned before: All of the colour-joy without any of the colour-changing work.
If you have seen the Yarn Arrival, the WIP post, or the Reveal post, you will know that my friend and side-kick Jenny Lowman made this gorgeous blanket. I like to keep growing my squares into 'Universes', just like I did with Sophie's Universe and like I am currently doing with Charlotte. While I entertain myself with that, Jenny entertains herself by creating 'Dreams' out of the large Squares (much like she did with Charlotte's Dream).
Just this week, Simy Somer sent me a clip from The BFG by Roald Dahl (oh, do see it if you haven't yet!). The clip is about Sophie's Dream.
"Is this why you called it that?" she asked? "No," exclaimed I, "but how absolutely fitting!"
The BFG was the first book I ever read voluntarily (and in English!). We got it from the library at 10 am on a Saturday. I curled up on a giant teddybear under the table in my bedroom and I didn't stop reading until I had finished it late that night. It was the start of my glorious love-affair (obsession) with reading.
So, what is Sophie's Dream?
It tells a story of a little girl. A little chiddler with her whole life ahead of her. With a fambly of her own. Little chiddlers of her own, too, someday. There will be great successfuls and funnies ahead for her, and… truth to tell, just a dribble of despair. Times'll be hard, times is be soft. Adventures will come and go. But in the end… she remembers the good deeds.
– Sophie's Dream, BFG, Roald Dahl (clip HERE).
Sophie's Dream Pattern
© Dedri Uys and Jenny Lowman 2018. All Rights Reserved.
This blanket consists of 12 Sophie's Garden squares, made using 4 different shades of colour-changing Scheepjes Whirl yarn. It is bordered with a simple popcorn edge (Really Lazy Popcorns), using colours that both calm and elevate the ones in the squares.
Resources
- Add This Pattern to Your Ravelry Queue
- If you would like some support and encouragement along the way, you can join THIS Ravelry Thread.
- **NEW** Paid PDF: I have now created a Paid PDF version of this pattern (US Terminology). The PDF includes:
- Materials for all four colourways/seasons
- Written-only instructions for Parts 1-4 of Sophie's Universe (forms the Gardens/Squares)
- Round-by-round charts by the very talented Masako Kawahara
- Instructions and photos for layout, joining, and border.
Translations
- Dutch Translation by Dianne Baan from Haakdingen
- Swedish Translation by Ulrika Larsson, Åza Karlsson, Camilla Fredriksson, and Agnetha Magnusson
- Japanese Translation by Masako Kawahara from Crochet Hmmm
**NEW** Colourways
Since I published this pattern, my dear Jenny has made three more Sophie's Dreams, bringing the total to four colourways – one for each season.
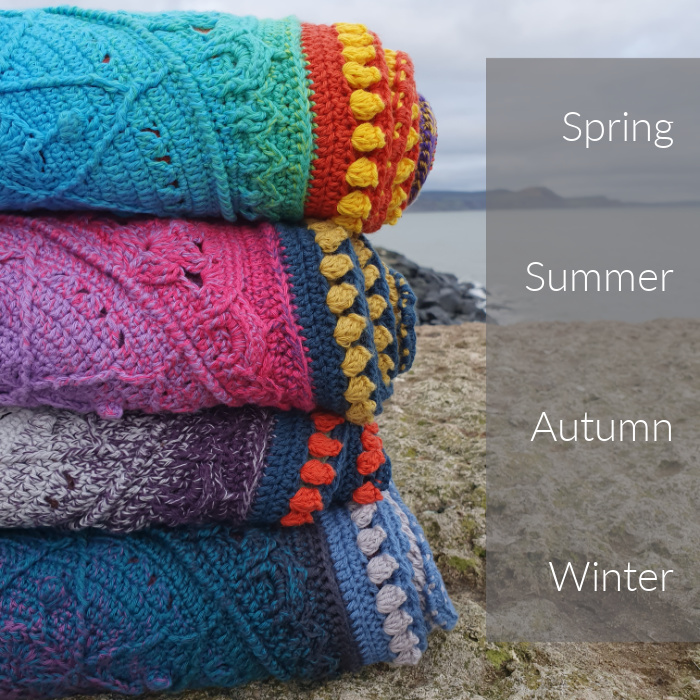
The pattern below is for the original (Summer) colourway. Although the pattern itself will not change between colourways, the colours, order of creation for the 'Gardens', and layout will. If, then, you choose to make one of the other colourways, you will need to look at the links below to see which colours to use (and in which order) and how we chose to join them.
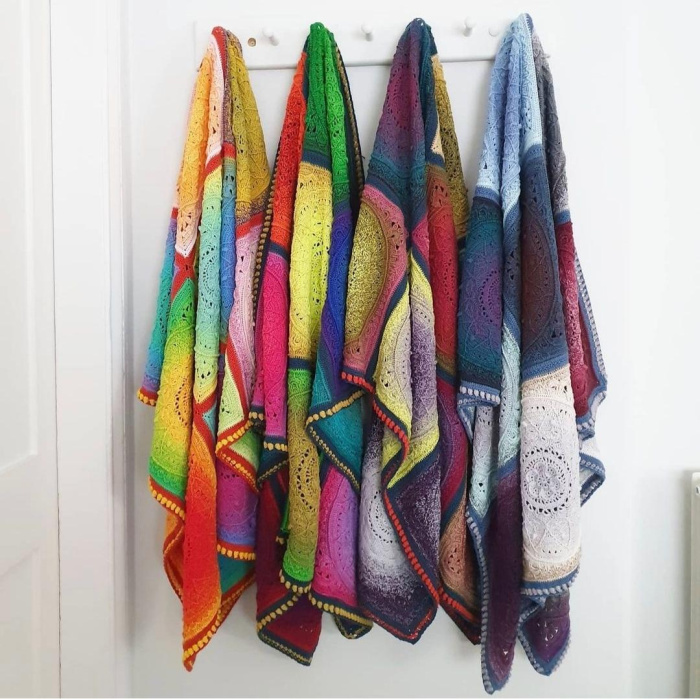
You can find instructions for the other three colourways here:
- Sophie's Winter Dream
- Sophie's Spring Dream
- Sophie's Autumn Dream
Materials
Yarn packs for each colourway are available in my Wool Warehouse Shop:
- Sophie's Summer Dream (Original)
- Sophie's Winter Dream
- Sophie's Spring Dream
- Sophie's Autumn Dream
Packs include printed instructions for turning 12 Sophie's Gardens into this beautiful blanket. The instructions supplied with each pack are specific to the colourway you choose. You can find the individual balls at any of the Scheepjes Stockists HERE.
- Hooks
- 2.75mm crochet hook (Parts 1 – 3 of Sophie's Universe)
- 3mm crochet hook (Part 4 of Sophie's Universe and Border)
- 3.25 mm crochet hook (Joining Only)
- Yarn
- Scheepjes Whirl (60% cotton/40% acrylic), 215–225g/1000m/1093yds
- Main Colour 1 (MC1) – 1 ball of Red Velvet Sunrise (764)
- Main Colour 2 (MC2) – 1 ball of Rosewater Cocktail (776)
- Main Colour 3 (MC3) – 1 ball of Key Lime Pi (780)
- Main Colour 4 (MC4) – 1 ball of Blackberry Mint Chip (769)*
- Scheepjes Whirlette (60%cotton/40%acrylic),100g/455m/497yds
- Border Colour 1 (BC1) – 2 balls of Blueberry (854)
- Border Colour 2 (BC2) – 1 ball of Mango (853)
- Scheepjes Whirl (60% cotton/40% acrylic), 215–225g/1000m/1093yds
Abbreviations
US Terminology
Please Note: This is a truncated Abbreviations list. It covers ONLY the abbreviations used for expanding, joining, and bordering the Sophie's Gardens. The 4-part instructions for the gardens each contain their own abbreviations.
- Ch – Chain
- Dc – Double crochet
- FP – Front post (explained in the pattern)
- Hdc – Half-double crochet
- RS – Right side
- Sc – Single crochet
- Sl st – Slip stitch
- Sp/sps – Space/spaces
- St/sts – Stitch/stitches
Punctuation
* An asterisk indicates pattern repeats. You will need to repeat all the instructions between asterisks the number of times specified. This is a hard-core repeat and will consist of multiple instructions.
Square Brackets [] indicate repeats. You will need to repeat the instructions between square brackets the number of times specified. This is a lower level repeat.
Parentheses () are used to indicate a group of stitches to be worked in the same st/sp .
Special Stitches
- Standing Stitches – Standing stitches are exactly the same as regular stitches, except that they are made 'in air', without being attached to a previous stitch. Start with a slip knot already on your hook and complete the stitch as normal.
Gauge
- At the end of Part 1, your motif should measure 9cm/3.5".
- At the end of Part 3, your motif should measure 26cm/10.2″
- Each finished 'Garden' should measure 32cm/12.6".
Please make sure that you are working to gauge, otherwise, you will run out of yarn. It is a good idea to make one square and weigh it before continuing (see Making the Gardens below).
Size
106cm x 142cm (41.7" x 56")
Instructions
Sophie's Garden
Sophie's Garden is a square created by following Parts 1 to 4 of Sophie's Universe (links below). You will need to make 12 'Gardens', three from each of the Main Colours (as specified below). There are step-by-step photo tutorials for each part, as well as very detailed video tutorials.
Pattern/Photo Tutorial
Using a 2.75mm hook (or size needed to obtain gauge), follow Parts 1 – 3 of Sophie's Universe for each Garden (see Making Gardens below for colourways):
- Sophie's Universe Part 1
- Sophie's Universe Part 2
- Sophie's Universe Part 3 *Up to and including the Crab Stitch Round.*
Swapping to a 3mm hook, follow Part 4 of Sophie's Universe:
- Sophie's Universe Part 4 *Don't make the Optional Flowers*
You can also find all 4 parts in the Sophie's Universe Book.
Making the Gardens
Each completed Garden should weigh between 68g and 72g. If your completed Gardens weigh more, you won't have enough yarn in each ball to make 3 of them.
Gardens A to C
With MC1 and working from the inside to the outside of your ball, make 3 squares, labelling them A, B, and C in order of creation.
Gardens D to F
With MC2 and working from the inside to the outside of your ball, make 3 squares, labelling them D, E, and F in order of creation.
Gardens G to I
With MC3 and working from the inside to the outside of your ball, make 3 squares, labelling them G, H, and I in order of creation.
Gardens J to L
With MC4 and working from the outside to the inside of your ball, make 3 squares, labelling them J, K, and L in order of creation.
Extra Finishing Round
When you have made all 12 Gardens, you will need to add an extra round to each of them using BC1 Whirlette. This helps to create a smooth look when joining. Using a darker colour like this also helps to tone down some of the brightness (especially in that Key Lime Pi!).
Round 37 (BC1)
Join BC1 yarn by making a standing double crochet in any ch-2 corner sp. (Dc, ch 2, 2 dc) in the same ch-2 sp. This is your first corner made.
*Dc in each of the 84 sts across. Don't forget the first (hidden) st. (2 dc, ch 2, 2 dc) in the next ch-2 corner sp.* Repeat from * to * 3 more times, omitting the last corner on the last repeat. Join to the top of the first dc with a sl st. Fasten off and work away your ends.
Stitch Count: 88 dc per side

Deciding on Your Layout
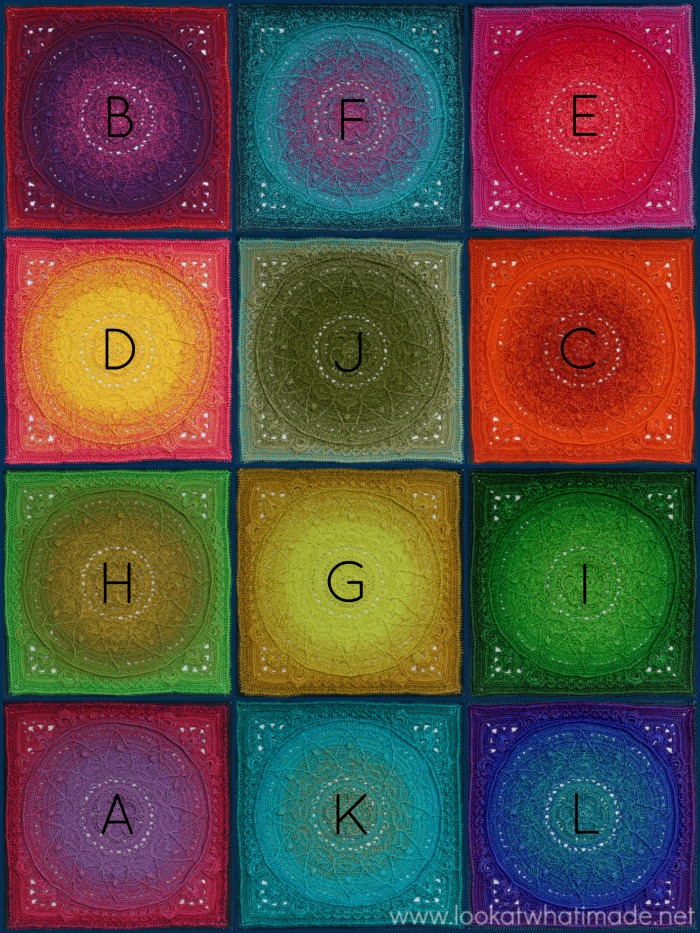
When you have made all 12 squares, you will need to join them to each other. I am going to show you how we chose to do our layout, but you are free to move the colours around.
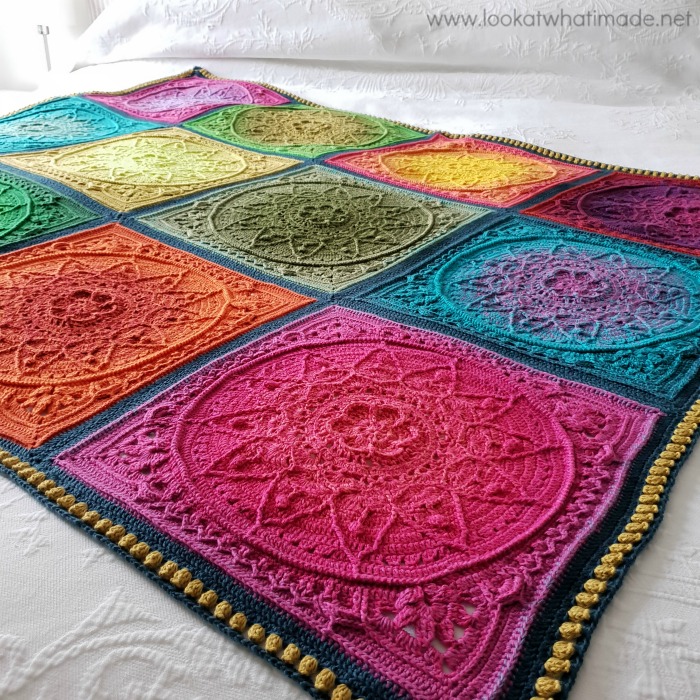
Jenny's Layout
Before joining everything, Jenny lent me all the squares for photography. I spent a glorious day photographing them and making sure that the colours were as accurately represented as I could possibly make them. When I was finished, I sent her MANY different collages to choose from before I joined the squares and returned her blanket back to her. After much playing around and Oohing and Aahing, we decided on the following layout:
Choosing Your Own Layout
If you do decide to move the colours around to better suit your taste, try not to put too many light or dark colours next to each other as this will make the blanket appear a bit lopsided.
- The best way to decide on a layout, in my opinion, is to photograph each blocked square and then crop them so that there is no background visible beyond the last BC1 Round. Make sure that you label them in a way that will be easily identifiable to you.
- Go to Picmonkey (free for this purpose, although paid options are available) and create a Collage in a 3 x 4 grid, roughly 1200 x 1600 pixels.
- Upload your photos and drop them into the Collage until you are happy with the results. You might want to save many different variations so that you can compare them later.
Alternatively, you can save the individual photos I shared at the start of this post and use them instead.
Joining the Squares
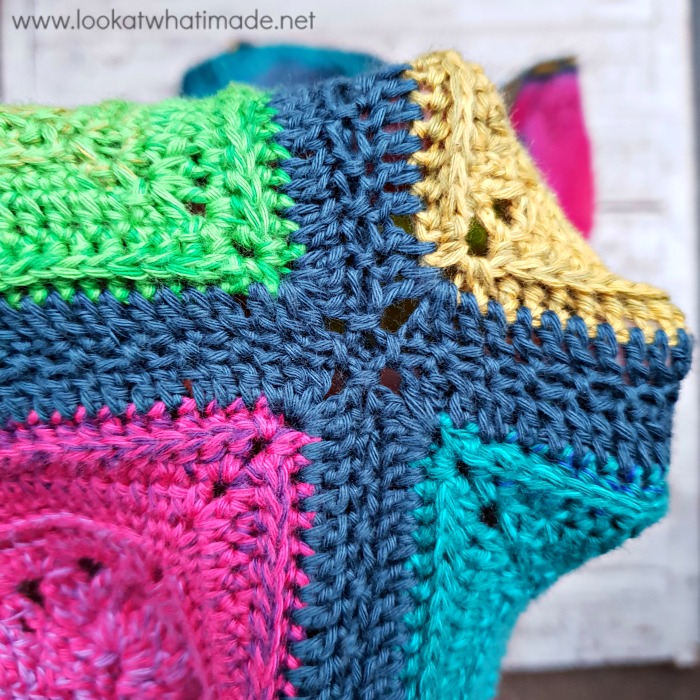
When you are happy with your layout, you will join your squares using the diagonal (Sc, ch 1, skip 1) join my granny taught me. It yields a flat seam on the front of your work that will look like little stitches. On the back of your work, the seam will be raised (but not as much as if you had made a sc in each stitch). This seam is reasonably elastic, provided that you don't make your chains too tight. If you need more help with this join, have a look at THIS TUTORIAL.
Starting the Diagonal Join
Join with a 3.25mm hook ( or size needed to obtain gauge ) and BC1.
Step 1
To join on the diagonal with the (Sc, ch 1, skip 1) Join, you will start with the bottom right square (bottom left, if you are left-handed). You will be attaching it to the square above it first, followed by the square directly next to it. You will need to refer to the layout photo above (or your own created layout photo).
Flip the square above the corner square over onto the corner square so that their RS are facing each other. With BC1 yarn, a slip knot already on your hook, and starting in the corner sp, make a sc through both layers of the ch sp. Ch 1. Insert your hook into the first st of the square closest to you, then insert your hook into thesecond st of the square farthest away from you and make a sc through both layers. *Ch 1, skip the next st of both layers, and sc through the next st of both layers.*
Repeat from * to * until you get to the next corner sp.Your last sc before the corner will fall in the second to last sc of the side for the top layer, and in the last sc of the side for the bottom layer.Into the corner space: (sc, ch 1) through both layers.
Step 2
Unfold your squares. Now that you have attached the square above the corner square, you need to attach the square next to it, so flip that square over onto the corner square so that their RS are facing each other. Insert your hook into the corner sp of the top square and then insert it into the corner sp of the bottom square. Make a sc through both layers and ch 1. Make a sc through the first st of the top layer and the second st of the bottom layer (as before). *Ch 1, skip the next st of both layers, and sc through the next st of both layers*.
Repeat from * to * until you get to the corner sp. (Sc, ch 1) in the corner sp. Fasten off and pull the ch st tight to form a little knot. Unfold the squares again. You should now have 3 squares attached to each other: two in the bottom row and one in the top row. They should look like steps. See Numbers 1-3 in the picture below.
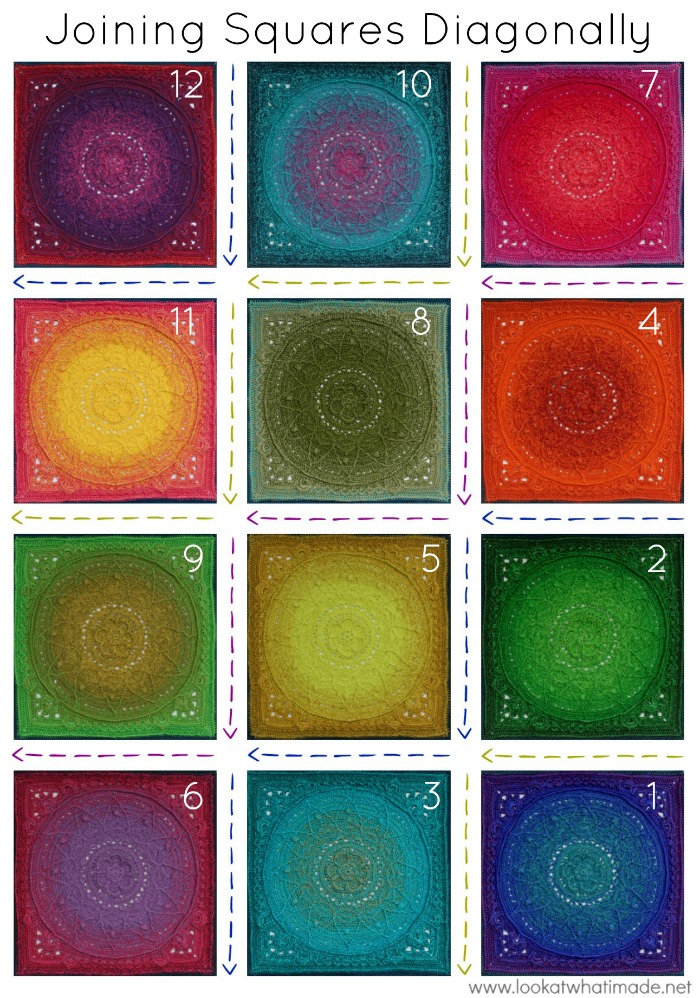
You will now continue to add your squares in diagonal strips.
Adding the Next Diagonal Strip
Place the next square above the top right-hand square (left, if you are left-handed). Place a square in the gap formed where the previous 3 squares meet. Place a square next to the bottom-left square (bottom-right, if you are left-handed). See Numbers 4-6 in the picture above.
Starting on the right (left, if you are left-handed), join the first 2 squares of the next strip as before. This will bring you to the 'inside' corner where the initial 3 squares meet. Unfold your squares and then fold the top 3 squares (2, 4, and 5 in the picture) over onto the bottom 2 so that you can attach the other side of the square.
Before you can join the next side, you need to anchor your work to the 'inside' corner created when you joined the first 3 squares. To do this, sl st into the ch-1 corner sp created when joining the first 3 squares. When you have made the sl st,ch 1. This is your corner made.
Insert your hook into the corner sp of the squares (through both layers as before) and make a sc. Continue with the (sc, ch 1, skip 1) seam as before, until you have attached all 3 squares to the previous 3 squares. When you have joined the last side, fasten off as before.
Adding Subsequent Diagonal Strips
Continue adding squares in a diagonal fashion, like steps. You will always start joining top-right (top-left if you are left-handed) and end bottom-left (bottom-right if you are left-handed). When you have 3 squares along the bottom, stop adding a square to the bottom-left corner of every strip (bottom-right if you are left-handed), so that you get a straight edge. When your blanket is 4 squares long, stop adding a square to the top-right corner of every strip (top-left if you are left-handed). Continue until you have joined all the squares.
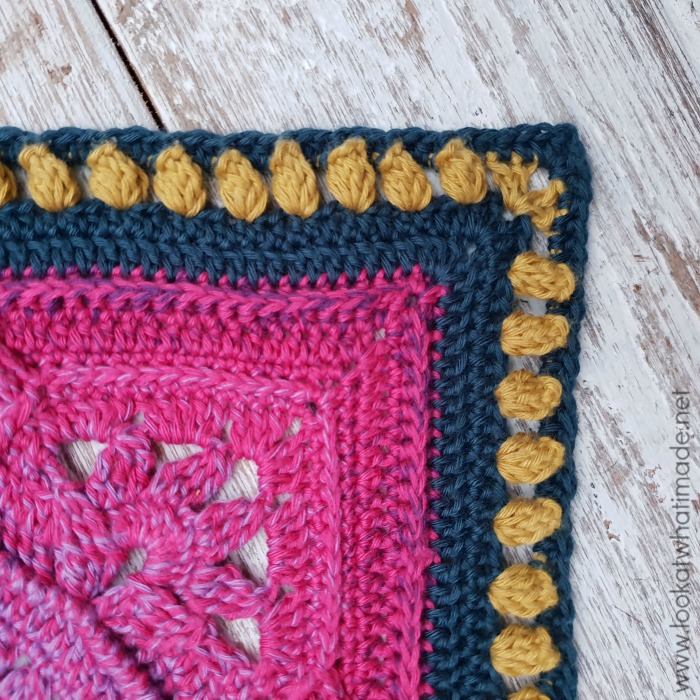
Adding the Border
When you have joined all your squares to each other, you are ready to add your border. The Popcorns in this border are created over 2 rounds. In Round 2, you will make a series of 5-dc groups. In Round 3, you will turn these 5-dc groups into Popcorns by using front post stitches.
Change back to a 3mm hook!
Border Round 1 (BC1)
When adding the first round of the border, the ch-2 corners of each square (along the edges of the blanket) will count as a stitch and should be worked into. Only the four ch-2 spaces in the corners of the blanket will be referred to as a ch-2 space.
Join BC1 yarn by making a standing double crochet in the ch-2 corner sp at the start of any long side. (Dc, ch 2, 2 dc) in the same ch-2 sp. This is your first corner made.
*Hdc in each st, remembering that the ch-2 sps along the edge count as sts and should be worked into. (2 dc, ch 2, 2 dc) in the next ch-2 corner sp.* Repeat from * to * 3 more times, omitting the last corner on the last repeat. Join to the first dc with a sl st. Fasten off and work away your ends.
Stitch Counts:
- Long Sides: 358 hdc and 4 dc
- Short Sides: 268 hdc and 4 dc
Border Round 2 (BC2)
Join BC2 yarn by making a standing double crochet in the ch-2 corner sp at the start of any long side. (Dc, ch 2, 2 dc) in the same ch-2 sp. This is your first corner made.
*[Ch 2, skip the next 2 sts, and make 5 dc in the next st] until you have 2 sts left. Ch 2 and skip the last 2 sts. (2 dc, ch 2, 2 dc) in the next ch-2 corner sp.* Repeat from * to * 3 more times, omitting the last corner on the last repeat. Join to the first dc with a sl st. Fasten off and work away your ends.
Stitch Counts:
- Long Sides: 120 5-dc groups and 121 ch-2 sps (not including corner spaces)
- Short Sides: 90 5-dc groups and 91 ch-2 sps (not including corner spaces)
Border Round 3 (BC1)
To make a FPhdc around a 5-dc group, yarn over and insert your hook from front to back into the ch-2 space before the 5-dc group. Insert your hook from back to front into the next ch-2 space so that the 5 dc's lie on top of your hook. Complete your hdc as normal, making sure that your working yarn is above the 5 dc's, not in front of them. This will pull the 5 dc's together and form a neat Popcorn. If you want more help, you can find a photo tutorial HERE.
Join BC1 yarn by making a standing half-double crochet in the ch-2 corner sp at the start of any long side. (Hdc, ch 2, 2 hdc) in the same ch-2 sp. This is your first corner made.
*Hdc in the first 2 sts and make 2 hdc in the first ch-2 sp. [Make a FPhdc around the next 5-dc group, make 2 hdc in the next ch-2 sp] until you have worked into every ch-2 sp. Hdc in the last 2 sts. (2 hdc, ch 2, 2 hdc) in the corner ch-2 sp.* Repeat from * to * 3 more times, omitting the last corner on the last repeat. Join to the first hdc with a sl st. Fasten off and work away your ends.
Stitch Counts:
- Long Sides: 370 hdc
- Short Sides: 280 hdc
Yay!! You are all done (fast-forward a few weeks or months)! Pat yourself on the back for me and have a lovely cuppa (or a G&T) to celebrate!
I can't resist crumpled-up blankets, so I will share one more photo…
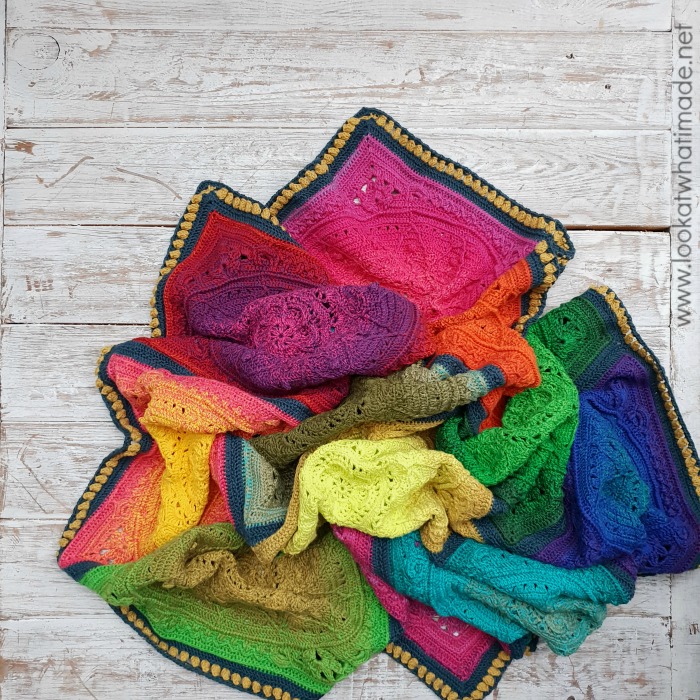
Thank you for choosing to make this blanket. If you share photos of your project, please use #sophiesdreamblanket so that we can all Ooh! and Aah!
Want to see more of our Sophie's Dream journey?
- Sophie's Dream Blanket Yarn
- Sophie's Dream Blanket WIP
- Sophie's Dream Blanket Reveal
More Whirl Patterns
- My Story Shawl
- Sophie's Universe in Whirl

This blog post contains affiliate links. I only link to products I personally use or would use. All opinions are my own.

What Does Sophie's Garden Mean
Source: https://lookatwhatimade.net/crafts/yarn/crochet/free-crochet-patterns/sophies-dream-pattern/
Posted by: bonnerwerve1939.blogspot.com
0 Response to "What Does Sophie's Garden Mean"
Post a Comment